Pete's FTP v1.0
© 2009 Peter Gordon
Web: http://www.petergordon.org.uk
E-Mail: pete@petergordon.org.uk
Program icon and all images by Martin 'Mason' Merz
© 2009 Peter Gordon
Web: http://www.petergordon.org.uk
E-Mail: pete@petergordon.org.uk
Program icon and all images by Martin 'Mason' Merz
Contents
Thanks to Steven Solie for his help and for his OpenSSH port, without whom SFTP support would not have been possible. Thanks also to Martin "Mason" Merz for the icon and logo.
Thanks also to the following for providing translations:
Javier de las Rivas (Spanish)
Hans-Joerg "Otti" Ottinger (German)
Alexandre Balaban and Jean-François Richard (French)
A very special thank you to those who have donated money to support my Amiga projects. Your donations mean a lot to me, especially as I have spent many, many hours of my spare time on these projects. Thanks also to my lovely wife for putting up with all the hours I spend on the Amiga :-)
This software is FREEWARE, but you are encouraged to send a PayPal donation to pete@petergordon.org.uk to encourage further development.
1. Introduction
Pete's FTP is an advanced FTP/SFTP client.
Features:
2. Requirements
Pete's FTP requires a computer running AmigaOS4.0 final or AmigaOS4.1 with a
working network connection. It has only been tested with the standard RoadShow TCP/IP stack
that comes with OS4.
Pete's FTP comes with its own icon set since 1.0. If you want to use AISS images, add "USE_AISS=Yes" to the tooltypes.
SFTP support requires at least version 52.3 of Steven Solie's OpenSSH port
to be installed and working. Pete's FTP will scan the system searchpath for the ssh
executable when run. If you wish to override that scan and specify a location, simply
add a tooltype to the PFTP program icon. For example, if the "ssh" executable is
at "Work:Comms/OpenSSH/bin/ssh", you would add the following tooltype to the icon:
SSHPATH=Work:Comms/OpenSSH/bin
If an SSHPATH tooltype is present, PFTP will look in that directory first, and if
there is no "ssh" executable there, it will revert to the system path scan.
Note: If you have a version of queue-handler older than 52.2 installed, Pete's FTP will hog CPU time when transferring data over SFTP. This is due to a bug in previous versions of queue-handler. This problem does not affect normal FTP transfers.
3. Using Pete's FTP
3.1 Getting Started
When run for the first time, you should be presented with a screen that looks
something like this:
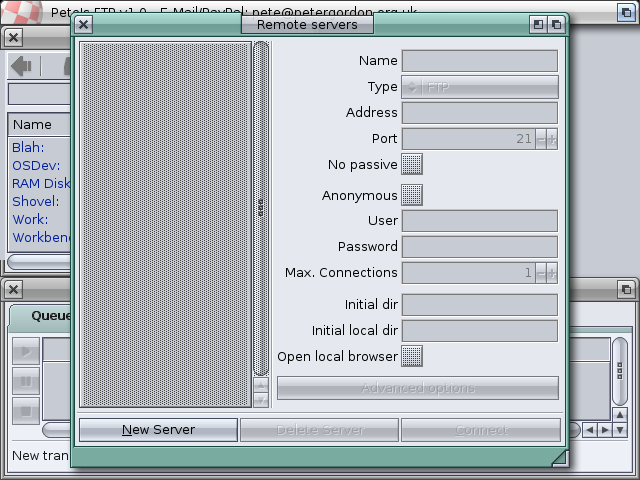
The remote servers window is where Pete's FTP stores all the connection information for the FTP or SFTP servers that you wish to connect to. Before you can connect, you have to create a new server entry by clicking the "New Server" button and filling in the details as described below:
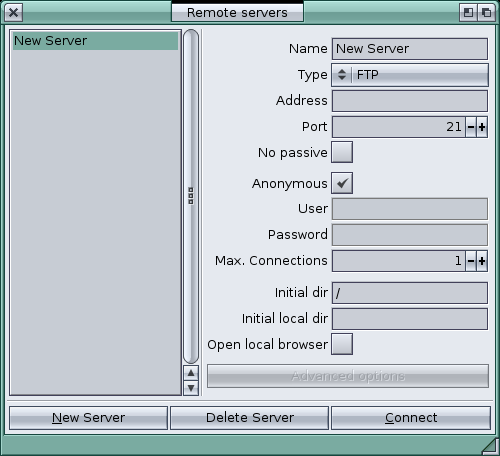
The meanings of the fields shown above depend on whether you are describing a normal
FTP server, or an SFTP server. The table below details the meanings:
| Name | This defines the name that appears in the list to the left of the "Remote servers" window. | |
| Type | Set to "FTP" | Set to "SFTP" |
| Address | This is the IP address or hostname of the server to connect to. | |
| Port | The port number to connect to. This is usually 21. | The port number for the ssh session. This is usually 22. If you don't have to specify a port number when using the command line sftp client, it is almost certainly 22. |
| No passive | Check this box if the server doesn't support passive transfers. | N/A |
| Anonymous | Check this box to use "anonymous" as the username and your email address as the password. The email address to use can be configured from the "Settings" tab of the control window (see the control window section later on). | N/A |
| User | This is the username to use when logging in to the FTP server. | This is the username to use when logging in to the SFTP server. Leave it blank if you don't need to specify one. |
| Password | This is the password to use when logging in to the FTP server. | This field is not used for SFTP, because OpenSSH handles all user authentication and will prompt for a password if one is required during connection. |
| Max. Connections | This is the maximum number of simultaneous connections Pete's FTP is allowed to use. Setting it to 2 or more allows you to keep browsing the FTP site while transferring files. However, most public FTP sites have user limits, so you should only ever set it to more than one if you know that it is allowed (such as when connecting to a server on your own network). | This is the maximum number of simultaneous open filehandles Pete's FTP is allowed to use. Setting it to more than 1 allows you to continue browsing the SFTP server while transferring files. Unlike FTP mode, this does not require more than one open connection to the SFTP server, so there is no need to limit it to one. |
| Initial dir | This is the initial directory to go to once connected to the server. | This is the initial directory to go to once connected to the server. A single period (.) usually refers to the users home directory on the server. |
| Initial local dir | This is the directory to go to in a nearby local browser. It works like this; if there is a local browser immediately to the left of the newly-opened remote browser, it'll set the path to the one you set here. | |
| Open local browser | When this is set, if there is no local browser immediately to the left of the newly opened remote browser, it'll open a new local browser and set it to the specified initial local directory. | |
| Advanced options | N/A | This opens the advanced SFTP options window. In here you can turn on compression ("-C" OpenSSH option), and FXP packet logging (for debug purposes) |
Once you have configured the server to your satisfaction, click "Connect" to connect to the server. The "Remote servers" window will disappear and a new remote browser window will appear. At first, the "Log" will be shown so that you can view the login process. Once the login is complete, you should be presented with a screen somewhat like this:
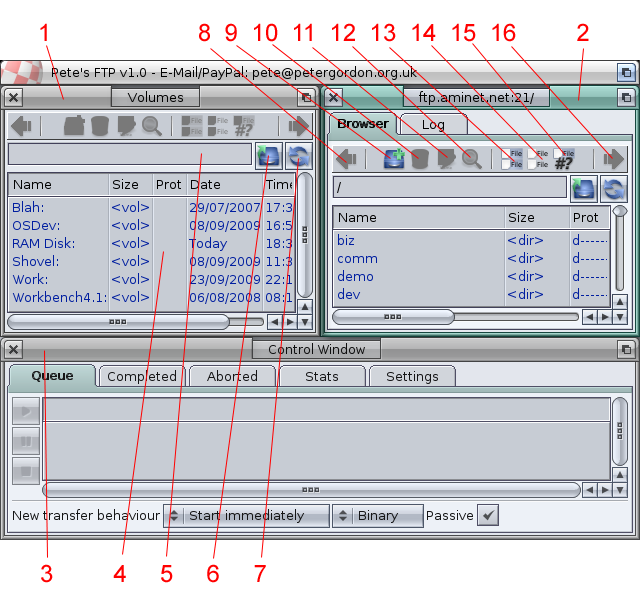
Legend:
1. This is a local browser window. It shows volumes, files and directories
of your local system. One is opened by default when you first run Pete's FTP, but you
can have as many open as you like by going to the "Project -> New -> Local browser"
menu option, or pressing "Right Amiga + L".
2. This is a remote browser window, which is connected to the Aminet FTP
server. You are not limited to one remote connection, you can open others by going
to the "Project -> New -> Remote browser" menu option, or pressing "Right Amiga + R".
3. This is the control window, which is described in detail later in the
document.
4. This is the file view. In here you can see the contents of the directory
specified in the directory field (5). On local browsers, clearing the directory field
lists available volumes.
5. This is the directory field. It lets you set the directory to view in a
local or remote browser.
6. This button goes to the parent directory.
7. This button refreshes the current directory.
8. This button transfers any selected files or directories from this browser
to the browser immediately to the left (if any). It is only enabled if you have
selected some files, and there is a browser to the immediate left that is currently
at a valid directory.
9. This button creates a new directory in the currently shown directory. You
will be prompted to specify a name for the new directory.
10. This button deletes any selected files or directories.
11. This button renames any selected files or directories.
12. This button views any selected files (with multiview by default). The
file viewer can be specified in the settings tab of the control window. If the file
is situated on a remote server, it will first be downloaded to T: (although this
temporary directory can also be specified in the settings tab of the control window).
13. This button selects all files and dirs in the file view.
14. This button unselects all files and dirs in the file view.
15. This button allows you to select files that match an AmigaDOS pattern. You
will be prompted to enter the pattern to use.
16. This button transfers any selected files or directories from this browser
to the browser immediately to the right (if any).
3.2 Transferring files
Once you have connected to one or more servers you can begin transferring files.
Before you start transferring files, check that the "New transfer behaviour" is
set correctly. It is located at the bottom of the "Queue" tab of the control
window, and lets you set 3 options related to transfers.
The first option changes between "Start Immediately" and "Add to queue". When set to "Start Immediately", any transfers you initiate will begin transferring as soon as possible. When set to "Add to queue" the transfers are added to the queue in a paused state. This allows you to browse and find all the files you want to transfer, and then transfer them all at once. This is most useful when browsing FTP sites and the "Max. Connections" setting is limited to 1.
The second option changes between "Binary", "ASCII" and "Auto". Binary mode ensures that the transferred file is bit-for-bit identical to the original file. ASCII mode may change the end-of-line markers of ASCII files as the file is sent. Auto mode uses the filename extension to determine whether to use binary or ASCII transfer mode. You can set the ASCII file extensions in the Settings tab of the control window.
The third option sets passive or active mode. In most cases, this should be left on passive.
Once you are ready to transfer files, the first thing you need to do is to select all the files and directories you wish to transfer in the source browser. There are then two ways you can start the transfer. If the destination browser window is immediately to the left or right of the source window, you can simply click the arrow in the top toolbar that points to the destination browser. If you need to transfer to a browser that is not immediately to the left or right, you can use drag-and-drop. To do so, make sure the source browser is the currently active window, and then click and hold the middle mousebutton over the file view. When you move the mouse, the selected files should be "picked up", like this:
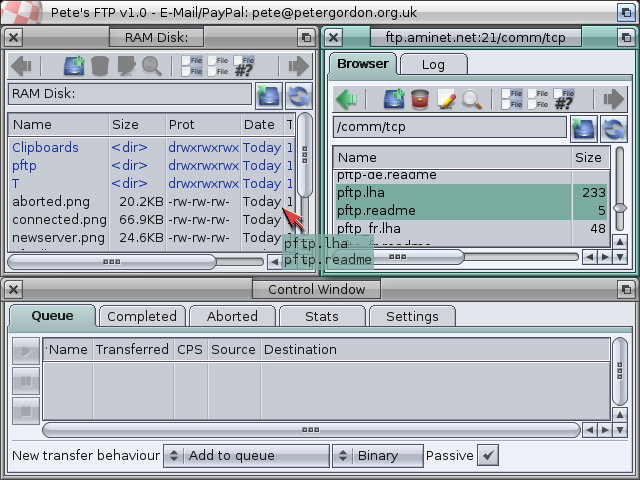
Drag the files to the desired destination browser, and let go over the file view area. If the destination browser is currently at a valid directory to receive files, the files should be added to the transfer queue in the control window. If the "New transfer behaviour" is set to "Start immediately", the files should start transferring straight away, otherwise they will be paused waiting for you to manually start them (See below).
3.3 Managing transfers
All transfer operations are managed through the "Control Window" at the bottom
of the screen. All current transfers show up in the "Queue" tab, which looks
like this:
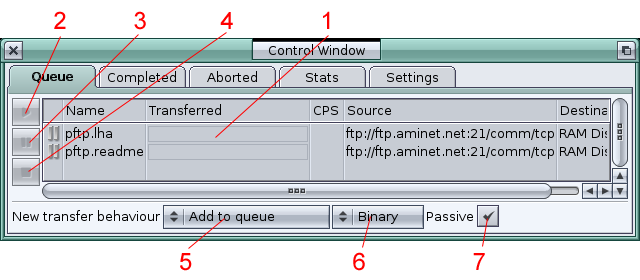
Legend:
1. This is the current transfer queue. Transfers with a grey "pause" icon
next to them are currently paused and need to be manually (re)started. Transfers
with a grey "play" icon next to them are active and will start transferring as soon
as the remote server(s) involved with the transfer have a free transfer slot.
Transfers with a green "play" icon next to them are active and currently being
transferred. These ones will show statistics about the transfer that update every
half second.
2. This button (re)starts paused transfers. You must first select the
transfers to (re)start from the transfer queue.
3. This button pauses any selected transfers in the transfer queue.
4. This button cancels any selected transfers in the transfer queue.
5. This determines whether new transfers should start immediately, or just be added to the queue in a paused state.
6. This selects whether new transfers should use Binary, ASCII or Auto mode.
7. This selects whether new transfers should use Passive or Active mode
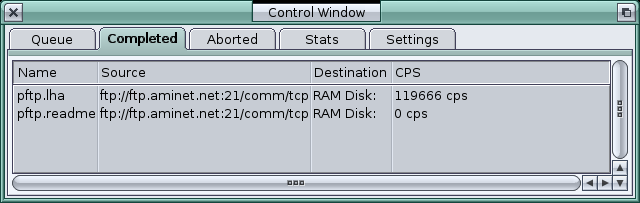
Once a transfer is successfully complete, it will be moved from the transfer queue to the completed transfer list:
However, if a transfer fails for any reason, or is manually aborted, it will be moved from the transfer queue to the aborted transfer list:
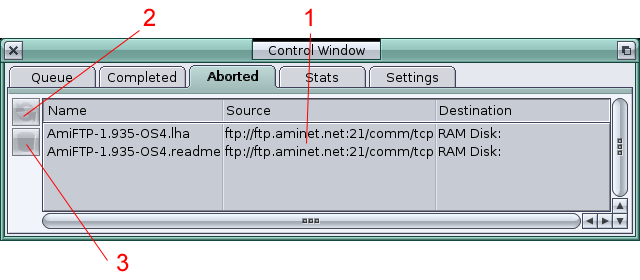
Legend:
1. This is the aborted transfer list
2. This button restarts any selected transfers from the list
3. This button deletes any selected transfers from the list
3.4 Transfer Statistics
The control window stats panel shows statistics about the data you
have transferred with Pete's FTP:
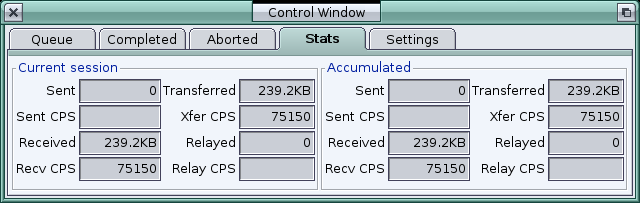
The Current Session group contains statistics about transfers since you started Pete's FTP, while the Accumulated group shows statistics for all your usage of Pete's FTP.
"Sent" is the number of bytes sent.
"Sent CPS" is the average chars per second for sent data.
"Received" is the number of bytes received.
"Recv CPS" is the average chars per second for received data.
"Transferred" is the number of bytes sent or received.
"Xfer CPS" is the average chars per second for the above data.
"Relayed" is the number of bytes sent during remote-to-remote transfers
"Relay CPS" is the average chars per second for relayed data.
3.5 Changing settings
There are various options that can be set through the control window settings panel:
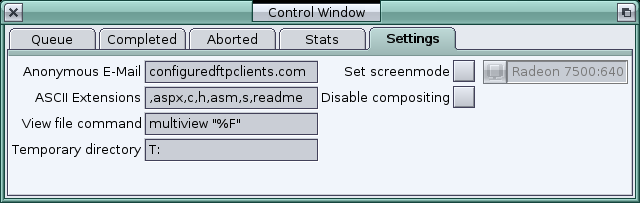
"Anonymous E-Mail" is the email address to use as a password when logging into
an FTP server in anonymous mode.
"ASCII Extensions" is a comma seperated list of file extensions to send in
ASCII mode when the new transfer behaviour is set to Auto.
"View file command" is the command to run when viewing a file. The filename
is inserted where the %F marker appears.
"Temporary directory" specifies the location Pete's FTP should use when
downloading a remote file to view.
"Set Screenmode" allows you to change the screenmode Pete's FTP uses. Note that
this setting only takes effect after you quit and reload Pete's FTP.
"Disable Compositing" allows you to disable compositing effects on the Pete's
FTP screen to conserve video RAM. Note that this setting only takes effect after you
quit and reload Pete's FTP.
4. History
To view the development history of Pete's FTP, please see
the included changelog file.
5. Future
Some features planned for future versions (no timetable):